Application
The application is what your device does. You build it in the AppBlocks step by placing blocks on a canvas and wiring them together into flows. Each flow starts with an event, such as a button press, a timer tick or a changed sensor value, and continues left to right through the actions and decisions that respond to it.
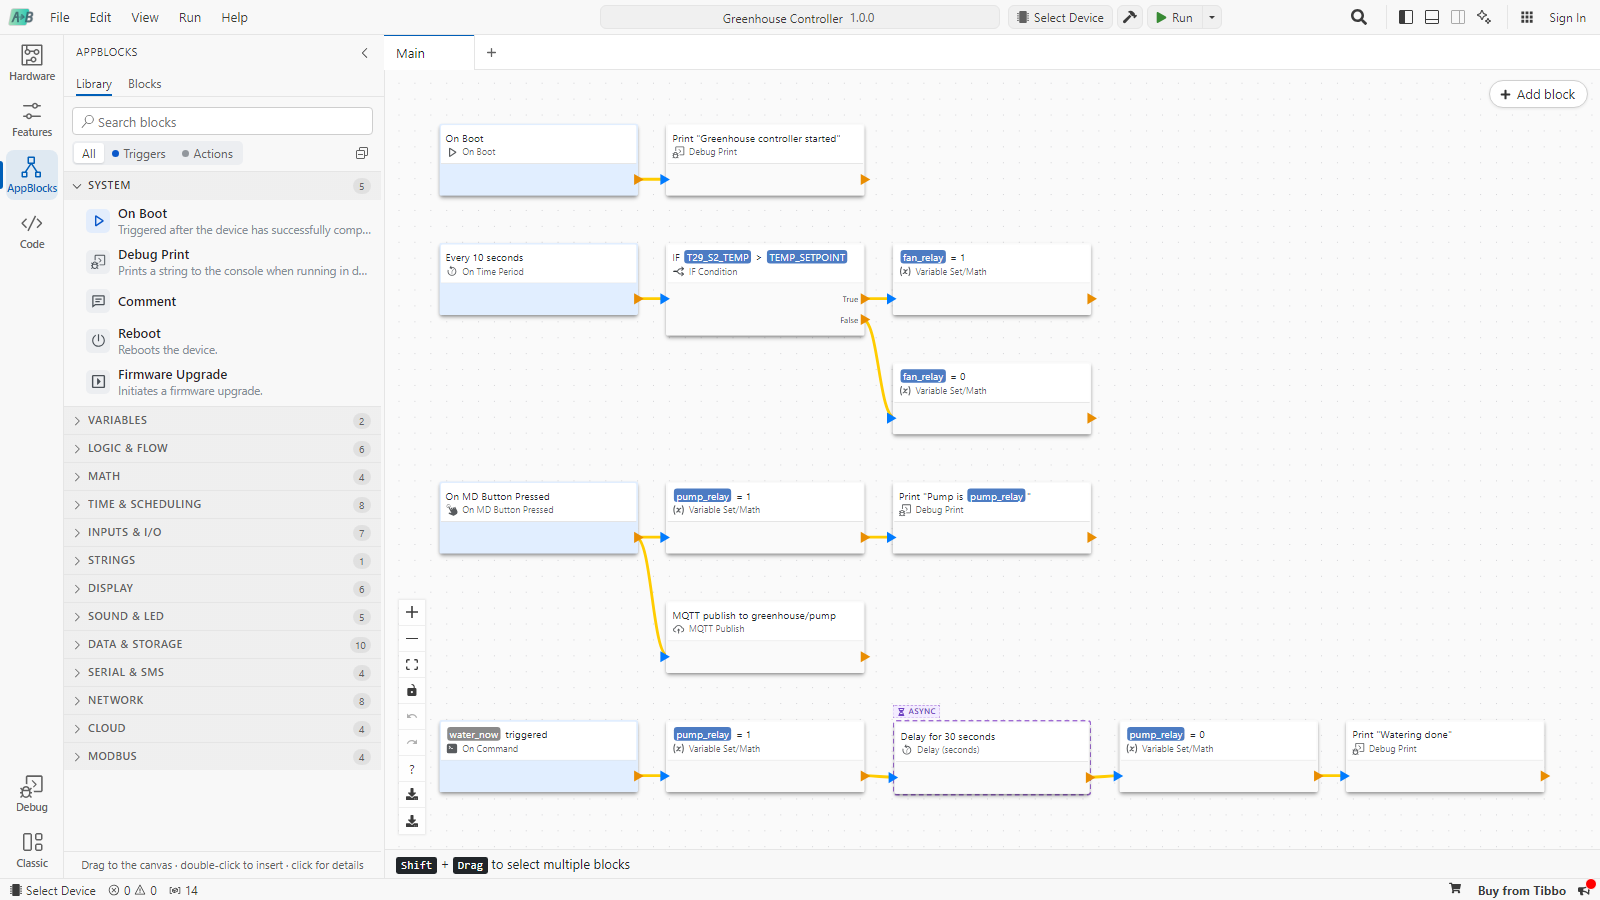
The application works with what the other two steps provide: the hardware gives it variables such as fan_relay and T29_S2_TEMP, and the features give it services such as MQTT, settings and the Web Console.
Blocks and flows
Every block has input ports on its left and output ports on its right. A wire from an output to an input means "when this block is done, run that one". There are three kinds of block:
| Kind | Ports | Examples | What it does |
|---|---|---|---|
| Event (trigger) | Outputs only | On Boot, On Time Period, On Variable Changed, On Command, On MD Button Pressed, On MQTT Notification, On HTTP Request | Starts a flow when something happens. Shown with a tinted background. |
| Action | An input and usually a Done output | Variable Set/Math, Debug Print, MQTT Publish, Table Insert, Delay (seconds) | Does one thing, then continues to the blocks after it. |
| Condition | An input and one output per outcome | IF Condition (True / False), IF Compound Condition, Switch (one output per case plus Default), For-Next Loop (Iteration / Done) | Chooses which way the flow continues. |
A flow is an event block and everything wired after it. This flow checks the temperature every 10 seconds and switches a fan on or off:
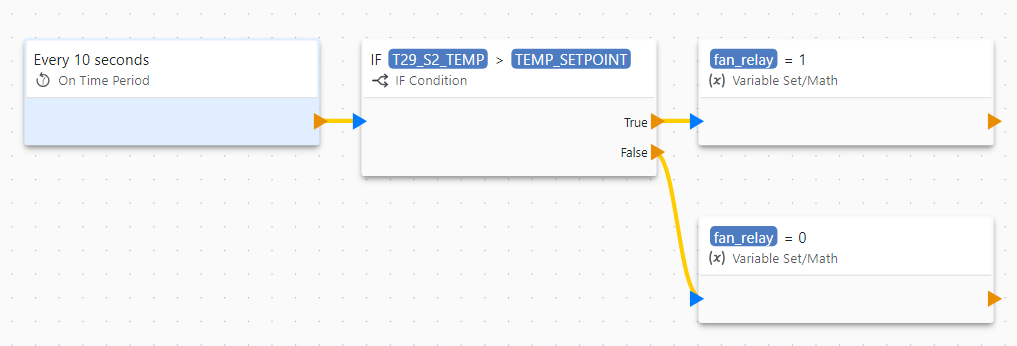
Every flow must start from an event. A block that isn't reachable from an event never runs: it is left out of the firmware.
Building a flow
Adding blocks
The Library tab of the sidebar lists every block available for your board, grouped into categories: System, Variables, Logic & Flow, Math, Time & Scheduling, Inputs & I/O, Strings, Display, Sound & LED, Data & Storage, Serial & SMS, Network, Cloud and Modbus. Within each category, event blocks come first.
- Type in Search blocks, or filter with All, Triggers (events) and Actions.
- Drag a block onto the canvas, or double-click it to insert it at the center of the canvas. You can also use Add block on the canvas, or right-click the canvas and choose Insert Block.
- Click a block in the library to see its description, parameters and output variables.
The Blocks tab lists the blocks already on the canvas.
Connecting blocks
Drag from an output port to an input port. While you drag, blocks you can't connect to are dimmed. The rules are:
- An output can be wired to several inputs, and an input can receive wires from several outputs.
- Nothing can be wired into an event block.
- Flows can't loop back on themselves. A wire that would create a loop is removed with Circular connection not allowed.
Configuring blocks
Select a block to edit its settings and parameters in the sidebar on the right. The block's toolbar has Add Breakpoint, Rename, Make a Copy and Delete Block.
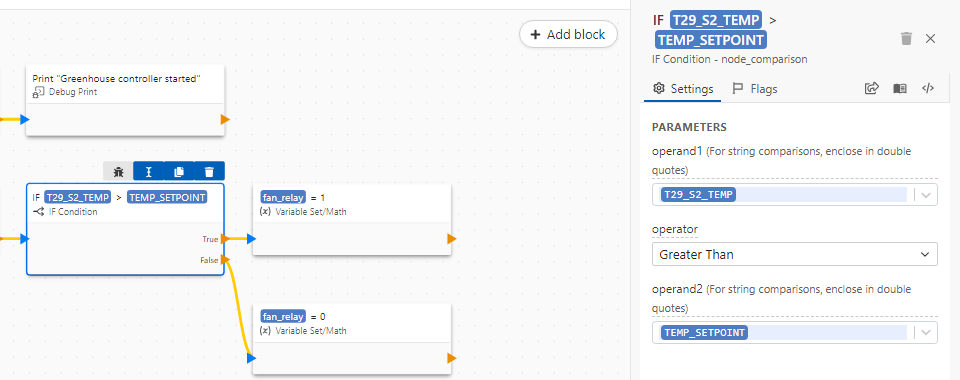
Parameters can contain fixed values, variables and expressions. Open a parameter's dropdown to insert:
- Variables: project variables, and the variables created by hardware, settings and timers. They appear as blue tags.
- Parameters: values that the block directly before this one passes along, such as
value_oldfrom On Variable Changed,time_nowfrom Get Current DateTime ordatafrom On Command.
A parameter such as time_now is available in the block wired directly to the output that provides it, not further down the flow. To use a value later, store it in a variable with Variable Set/Math first.
Organizing with tabs
Large applications can be split across tabs. The first tab, Main, is always there. Click + to add a tab, double-click a tab to rename it, and drag tabs to reorder them. To move blocks, select them and use Move to Tab; wires to blocks outside the selection are removed.
Tabs only organize the canvas. They don't change how or when flows run.
Use the Comment block to label flows. It has no ports and doesn't affect the firmware.
How the application runs
The application is event-driven. After the device boots, it waits for events and runs the flow attached to each one.
- On Boot flows run once, after the hardware and features have initialized.
- Time-based events come from On Time Period, timers and schedules.
- On Variable Changed fires whenever a variable gets a different value: from a block, from a sensor reading at the update interval, or from a dashboard or the cloud.
- External events come from buttons, commands, network messages, serial data and so on.
Execution order
When an event fires, its flow runs depth-first:
- The flow follows each wire to the end of its branch before starting the next branch.
- When an output has several wires, they run top to bottom, by the position of the blocks they lead to on the canvas.
Horizontal position doesn't matter; only the vertical order of branches does. To change the order, move a branch up or down.
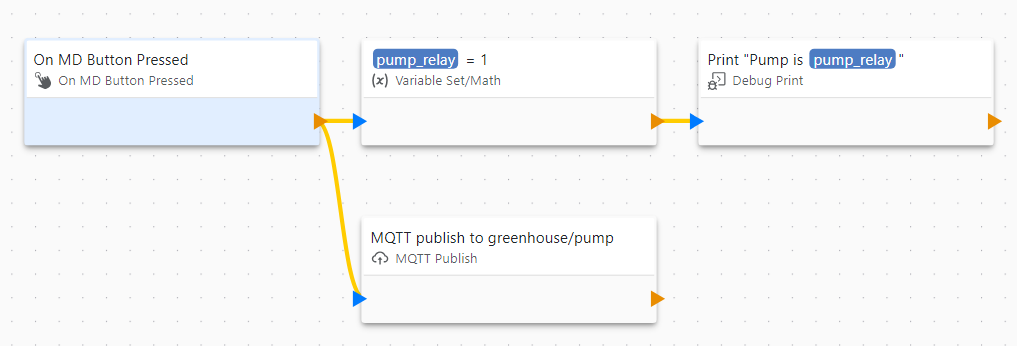
For this flow the order is:
The whole upper branch, including the print, finishes before the MQTT message is published.
A few more rules follow from this:
- Setting a variable can start another flow. If the value actually changes, its On Variable Changed flows run. On TiOS they run straight away, before the next block in the current flow.
- A block with several incoming wires runs each time any of them reaches it. Its runs are not merged.
- Events are handled one at a time on TiOS. An event that happens while a flow is running is handled when the flow finishes. On Zephyr, flows run in prioritized queues, so a time-critical flow such as a button press can run while a lower-priority one, such as a network message, is paused.
Keep flows short. A flow that runs for a long time delays every other event.
Asynchronous blocks
Some blocks start work that takes time, then let the device carry on. They are marked ASYNC on the canvas: Delay (seconds), HTTP Request, Modbus Request, Send Email, Play Audio File, Calculate and Random.
The blocks after an asynchronous block run later, as a separate step, when its work is done. In the meantime the device keeps handling other events.

Because the rest of the flow runs as a separate step, parameters of blocks before the asynchronous block are no longer available after it. Use variables to carry values across.
A delay doesn't block the device, so a long delay is safe. On TiOS, running the same Delay block again while it is waiting restarts it. For repeated or cancellable waits, use timers instead.
Checking and debugging
AppBlocks checks the application as you edit. Problems appear in the Problems tab of the bottom panel, and a canvas tab with problems shows a warning icon. Common ones:
| Message | What to do |
|---|---|
| Invalid Variable: … | A parameter refers to a variable or parameter that doesn't exist here. Pick another, or store the value in a variable first. |
| Value must be set for … / Parameter cannot be empty. | Fill in the parameter. |
| … must be between … and … | Enter a value in the allowed range. |
| … is not defined | Choose the item the block needs, such as its Variable or Command. |
| Recursion not allowed | A flow that starts with On Variable Changed sets the same variable. Use a second variable, or restructure the flow. |
To see what the application does on a real device, run it in Debug mode:
- Debug Print blocks write messages to the Debug Console.
- Add Breakpoint on any block except an event pauses the application when that block is reached, on TiOS devices and in the Simulator. The block is highlighted, and its toolbar offers Continue, plus Step Over in the Simulator.
- The Variables panel shows the live value of every variable and lets you change it on the device.